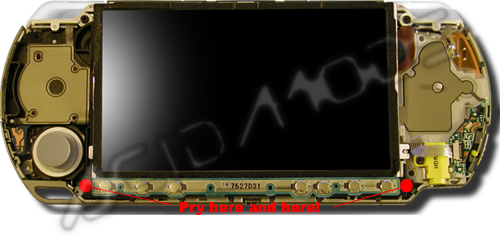
STEP 1: The first thing you will have to do is remove the Warranty Sticker from the Battery compartment, and depending on the placement of the serial number/device information sticker. You will notice that instead of 6 screws on the back of the original PSP, the new Slim & Lite PSP only has 4 screws (indicated by the 4 red dots), but there are also 3 screws along the trim that must be removed as well, one at the bottom, and 2 at the top. Now the Face-plate may be removed.

STEP 2: Now you can see the internals of the PSP, unlike the original PSP, the home bar’s ribbon cable isn’t attached to the power board, instead it is attached underneath the LCD screen. The Home Bar’s clips must be released from both ends of it, not unlike the original, then let the home bar to hang as shown.
STEP 3: To remove the LCD you gently pry the clips on the edges, much like you would for the original PSP.

STEP 4: Now, open the ribbon clamps for the LCD screen and Home bar, by flipping up the tabs on the clamps.

STEP 5: Next, remove the metal shielding, then remove the screws that are holding the trigger buttons in place, and remove them.

STEP 6: Open the Clamp of the D-Pad? ribbon cable, and slip your tweezers underneath it to unseat the cable. You will also have to remove the sticky backed trigger button pad from its shelf on the back-plate, and open the Memory Stick door completely, before you can remove the D-Pad? assembly.
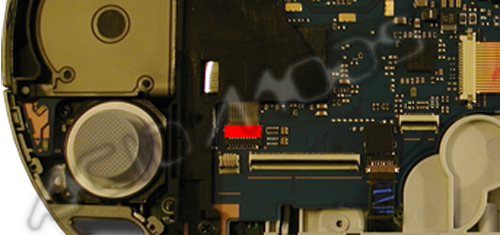
STEP 7: Remove the screw holding the power board and open the ribbon cable clamp, then remove the power board.

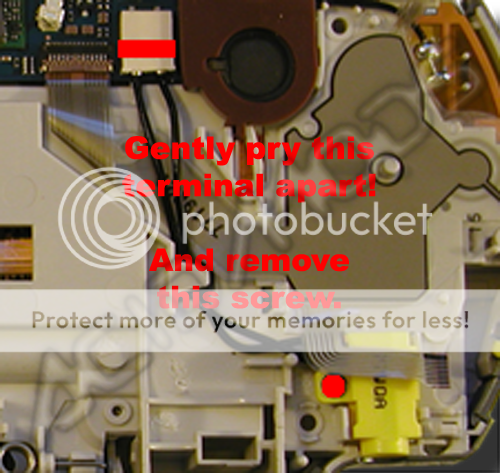
STEP 8: Now remove the screw that is holding the charge plug and disconnect the charge plug terminal. The charge plug is held in by both the screw and plastic clips so gently pry them open until you can easily remove the charge plug. You can also remove the right side speaker by gently prying it out of its clips.
STEP 9: Now, open the ribbon cable clamp for the face buttons (Square triangle, etc.) and remover the sticky backed trigger button pad from it’s self on the back-plate, and remove the face button FPC (Flexible Printed Circuit).

STEP 10: To remove the Mother Board, also known as the MoBo? you must remove the ribbon cable clamps for the UMD laser and drive assembly, and the terminal for the WiFi? antenna. Then the MoBo? can be lifted out, remember that the USB port sticks through the trim so you will have to lift from the bottom of the MoBo?, and pull down to unseat the MoBo?.
Once again remove the metal shielding.

STEP 11: Now, remove the screw holding the analogue nub in place and remove it.

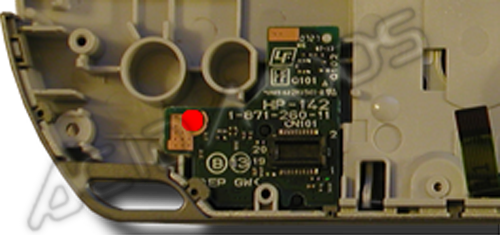
STEP 12: Underneath you will see the daughter board for the AV port, remove the screw holding it in and take out the board, remembering to lift from the top and slide the port out.
STEP 13: Now the really fun part, first pry the spring from the UMD door hinge, next to remove the UMD door, the best way I have found is to slide a small flat-head screw-driver into the opening from the front on the right side, and gently prying the hinge out, now there may be a better way to do this but I wasn’t willing to try too many ways in the fear of scratching my PSP which was disassembled in less than hour from receiving it. Once the first hinge is removed you can easily remove the second hinge, but the door isn’t off yet. You have to remove the H frame hinge from the UMD door, to do this slide the H frame to the bottom of it’s tracks on the door, and lateral to the door, slightly squeeze above the pins and they will be free.
Now remove the 4 screws from the UMD laser drive and remove it,

STEP 14: To get the H frame off you will have to either remove the small sticky-backed rubber blocks from the sides of it’s hinges with your tweezers, or slide a small flat-head screwdriver in between to allow enough space to remove the hinges.

STEP 15: Now all that’s left is to remove the sticky-backed WiFi? antenna from the back-plate and you are done, you now have a completely disassembled PSP Slim & Lite.

.


